post installation for ubuntu
-
code server install
-
code-server: vim ~/.config/code-server/config.yaml
-
sudo systemctl restart code-server@$USER
-
python性能分析工具
https://zhuanlan.zhihu.com/p/110105273
-
终端录制转化为svg
-
录制终端转化为 svg: pip3 install --user termtosvg
- sudo snap install termtosvg-simosx
- termtosvg-simosx.termtosvg animacion.svg

-
卸载不必要的自带软件: https://www.jianshu.com/p/67a86505279f
- v2rayl: https://gitee.com/sLarson/v2rayL
sudo apt install git # git
sudo apt install axel
- unable to access samsung_t5: sudo apt-get install exfat-utils exfat-fuse
- python 安装PyQt5: sudo apt-get install python3-pyqt5
- ssh server
- install anaconda
- install v2ray: delete /etc/sudoers.d/myuser
- conda install tf-gpu: conda install tensorflow-gpu keras
- tf install
- 版本兼容问题:cuda9.0/tf1.12/cudnn-7.6.5
- conda update -n base conda/conda update --all
- conda install opencv
- conda install scikit-learn
- conda install -c conda-forge opencv=4.1.0
- conda install -c simpleitk/label/dev simpleitk
- sudo apt-get install p7zip-full
-
install opencv
- conda activate
- sudo apt-get install build-essential cmake git libgtk2.0-dev pkg-config libavcodec-dev libavformat-dev libswscale-dev python-dev python-numpy libtbb2 libtbb-dev libjpeg-dev libpng-dev libtiff-dev libjasper-dev libdc1394-22-dev libgtk-3-dev libgtkglext1-dev libgstreamer1.0-dev libavresample-dev libgphoto2-dev libopenblas-dev libatlas-dev doxygen libgstreamer-ocaml-dev libgstreamer-plugins-bad1.0-dev libgstreamer-plugins-base0.10-dev libgstreamer-plugins-base1.0-dev libgstreamer-plugins-good1.0-dev libgstreamer0.10-dev libgstreamer1.0-dev libgstreamermm-1.0-dev tesseract-ocr-dev liblept5 libleptonica-dev liblapacke-dev python3-numpy libv4l-dev python3-numpy python3-pip python-pip libprotobuf-dev libhdf5-dev libgflags-dev
- mkdir build
- cmake -D CMAKE_INSTALL_PREFIX=/usr/local -D CMAKE_BUILD_TYPE=Release -D OPENCV_EXTRA_MODULES_PATH=../opencv_contrib/modules -D BUILD_opencv_python3=ON -D PYTHON3_EXECUTABLE=/home/yee/program/anaconda3/envs/tf36/bin/python3 -D PYTHON3_INCLUDE_DIR=/home/yee/program/anaconda3/envs/tf36/include/python3.6m -D PYTHON_DEFAULT_EXECUTABLE=/home/yee/program/anaconda3/envs/tf36/bin/python3 -D PYTHON3_LIBRARY=~/program/anaconda3/envs/tf36/lib/libpython3.6m.so.1.0 -D BUILD_opencv_xfeatures2d=ON -D BUILD_TIFF=ON -D ENABLE_PRECOMPILED_HEADERS=OFF ..
-
cmake .. -D CMAKE_BUILD_TYPE=RELEASE -D OPENCV_EXTRA_MODULES_PATH=../opencv_contrib/modules -D CMAKE_INSTALL_PREFIX=/usr/local -D BUILD_opencv_python2=OFF -D BUILD_opencv_python3=OFF -D WITH_CUDA=OFF -D BUILD_opencv_xfeatures2d=ON -D BUILD_TIFF=ON -D ENABLE_PRECOMPILED_HEADERS=OFF
-
make error: libzstd.so.1, needed by/lib/libtiff.so.5, not found
- cmake加入参数: -D BUILD_TIFF=ON -D ENABLE_PRECOMPILED_HEADERS=OFF
- cannot find .i file: build/CMakeDownloadLog.txt 有下载链接
- no such file or directory:用绝对路径
- sfm: include_directories(/home/yee/program/opencv-3.4.1/opencv_contrib/modules/xfeatures2d/include)
- 找不到cuda.hpp即matchers.hpp:52:42: fatal error: opencv2/xfeatures2d/cuda.hpp: No such file or directory
- 解决方法: opencv/modules/stitching/CMakeLists.txt文件中加入一条语句使其include opencv_contrib/modules/xfeatures2d/include,可以是绝对路径,如
- sudo apt-get install libeigen3-dev
- Sophus ``` git clone https://github.com/strasdat/Sophus.git cd Sophus git checkout a621ff
mkdir build cd build cmake .. #CMake上层目录 make #无需安装
fnd_package指令查找Sophus库
find_package( Sophus REQUIRED ) include_directories(${Sophus_INCLUDE_DIRS})
add_executable( useSophus useSophus.cpp) #添加可执行文件 target_link_libraries( useSophus ${Sophus_LIBRARIES} ) #添加链接库 ``` 15. git download - export ALL_PROXY=socks5://127.0.0.1:1080 - git clone git仓库地址 --depth=1 下载最新的一个版本而不是所有版本 - git config --global http.proxy 'socks5://127.0.0.1:1080' git config --global https.proxy 'socks5://127.0.0.1:1080' 16. pip 源设置 https://pypi.tuna.tsinghua.edu.cn/simple some-package
- conda activate
安装中文输入法
启动项
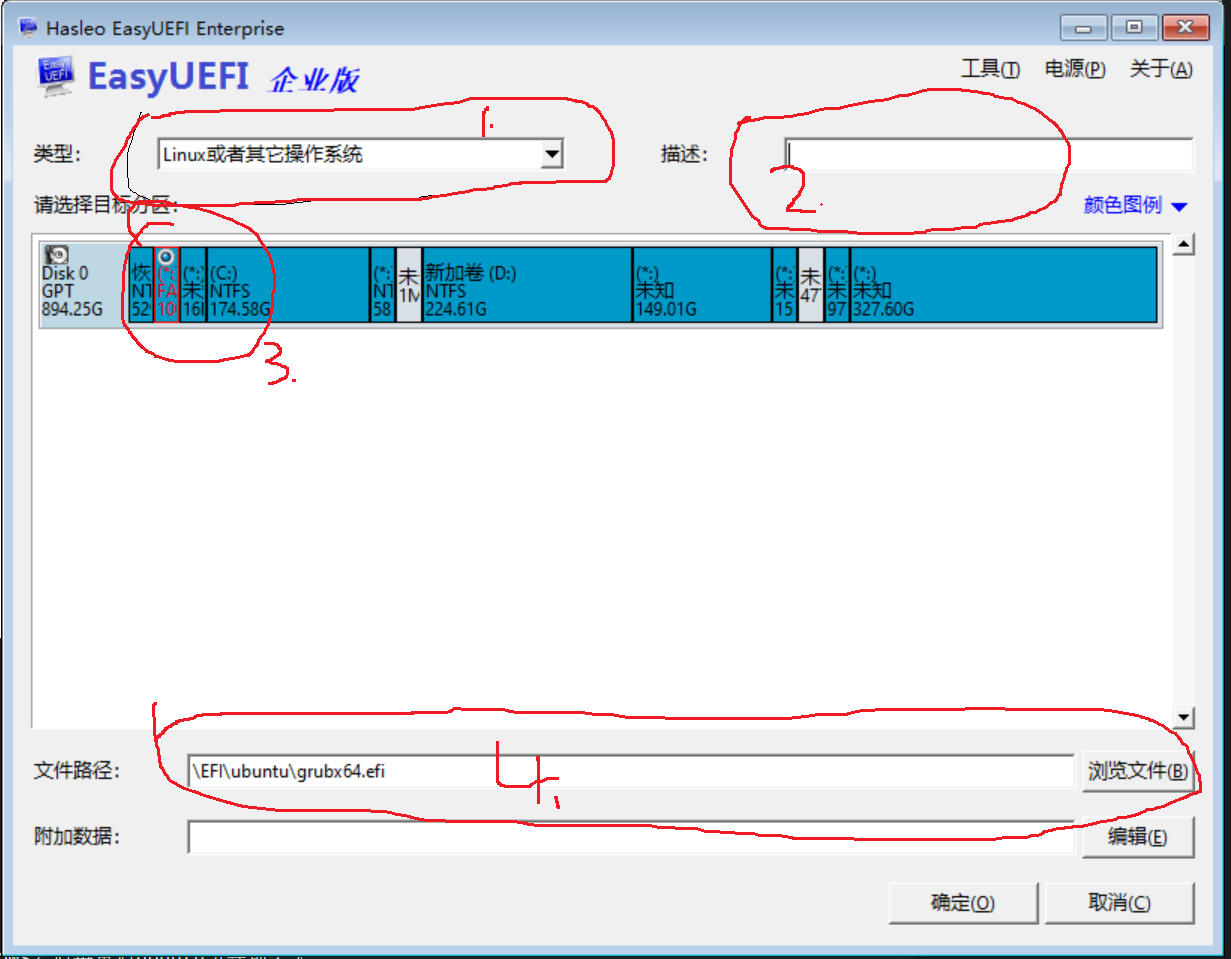
windows-10 + ubuntu-16双系统,切换至windows之后再重启ubuntu引导项丢失:
解决方案:使用easyuefi增加引导项
添加自动启动项
gnome-session-properties:打开 Startup Applications Preferences
ubuntu
- bin: ~/bin
- path: ~/.profile
- desktop: /home/yee/.local/share/applications
pytorch
axel -n 16 https://download.pytorch.org/whl/cu100/torch-1.3.0%2Bcu100-cp36-cp36m-linux_x86_64.whl

axel -n 16 https://download.pytorch.org/whl/cu100/torchvision-0.4.1%2Bcu100-cp36-cp36m-linux_x86_64.whl

pip install xxx.whl
tensorflow
pip install tensorflow-gpu==2.0.0
openssl
sudo apt-get install openssl

sudo apt-get install libssl-dev
hp z420
- Advanced -> Device options -> mass storage option roms -> EFI
install
sudo apt install curl
                openssh-server
                cmake
                git
                kazam
                tmux
                flameshot: screenshot
                axel
                p7zip-full
                libeigen3-dev

opengl
foxitreader
vs code
python
    matplotlib
    scipy
    numpy

peek  #  to gif
python 3.6.9
cuda 11.0
cudnn 8.0
pytorch
    - commond: pip install torch==1.7.1+cu110 torchvision==0.8.2+cu110 torchaudio==0.7.2 -f https://download.pytorch.org/whl/torch_stable.html
    - ref: https://pytorch.org/get-started/previous-versions/
tensorflow:
    - command
        - pip3 install tensorflow-gpu==2.4
        - pip install .whl
    - ref: https://pypi.tuna.tsinghua.edu.cn/simple/tensorflow-gpu/
xrandr --output HDMI-0 --primary --mode 3840x2160 --scale 0.66x0.66 --output HDMI-1 --left-of HDMI-0
xrandr --output HDMI-1 --rate 60 --scale 1x1 --mode 2560x1440 --auto --primary --pos 0x0 --output HDMI-0 --rate 60 --scale 0.66x0.66 --pos 2560x0 --auto